
Buying Guide and DIY Mod · Portable Air Conditioning
Dual-Hose Portable Air Conditioner UK: What You Can Buy, and the £20 Mod for the One You Own
Dual-hose portable air conditioners are hard to find in UK shops. Here's what you can buy today, and the cheap, reversible second-hose conversion that gives a single-hose unit the same airflow.
Last updated: 4 October 2026
Affiliate disclosure: the product and parts links on this page are affiliate links. If you buy through them we earn a small commission at no extra cost to you. It doesn't affect what we recommend.
If your portable air conditioner has one hose going to the window, it's fighting itself. Every hour it runs, it pumps hundreds of cubic metres of air out of your room, and that air has to be replaced. It's replaced by hot outdoor air pulled in through every gap in your home. Your AC is dragging the heat of the day into the room while it tries to cool it.
Quick answer: very few factory dual-hose portable air conditioners are sold in the UK, and the popular models from Meaco, De'Longhi and AEG all use one hose. You have four realistic routes: convert a single-hose unit for £18–£40 in parts, buy a hose-free Midea PortaSplit for about £1,100, wait for the small EcoFlow WAVE 3 to come back into stock, or take a chance on a marketplace import. All four are compared below.
The mod in one line: a second hose feeds outdoor air straight to the condenser intake, so the unit stops throwing cooled room air out of the window. It takes an afternoon and typically improves effective cooling by 20–40%. Factory dual-hose units are built on the same principle.
Before you start the mod: you must be able to identify your unit's separate room-air intake and never cover it. Covering it can freeze the coil and damage the compressor. Full safety detail below.
On this page:
Can you buy a dual-hose portable air conditioner in the UK?
Yes, but the choice is thin. In the US, dual-hose units from Whynter, Midea and others are easy to find. Here, the portable units stocked by the big retailers are single-hose almost without exception, because they are cheaper to make, lighter to ship and simpler to fit to a UK window. A dual-hose portable air conditioner is a normal portable unit with a second hose that brings in outdoor air to cool the hot side, so it never blows your cooled room air outside.
These are the four ways to get that result in a UK home, with prices and stock checked on 3 and 4 October 2026.
| Route | Typical cost | Stops hot air being pulled in? | Best for | The catch |
|---|---|---|---|---|
| Convert a single-hose unit | £18–£40 in parts | Yes, if well sealed | Anyone who owns a suitable unit, or is about to buy one | An afternoon of DIY, and a possible warranty argument |
| Midea PortaSplit | About £1,100 | Yes. It has no air hose at all | Daily use, bedrooms, renters who can't fit a split | Price, and you need somewhere outside the window for the outdoor half |
| EcoFlow WAVE 3 | £850–£1,300 | Yes, with both ducts fitted | Tents, vans, garden offices, one small room | About 6,100 BTU, and out of stock at EcoFlow UK |
| Marketplace dual-hose import | Varies | Yes, if it is what it claims | Buyers happy to check specs and take a risk | Little-known brands, thin UK support, some are US 115V models |
Convert a single-hose unit
The cheapest route · works on most units with two separate rear grilles
If you already own a single-hose portable, this is the answer for most people: a second hose, a window seal and tape. If you don't own one yet, a well-reviewed single-hose unit plus the mod gives you dual-hose airflow for the price of the unit and about £20. Check the candidate checklist first, and pick a model from our best portable air conditioner guide with two clearly separate grilles on the back.
Midea PortaSplit 12,000 BTU
Hose-free · heats and cools · 39 dB in silent mode · A++
Not a dual-hose unit, and better than one. The compressor sits in a separate outdoor box that stands on the ground or a balcony, or hangs from a window bracket sold separately. A fixed 2-metre refrigerant line joins it to the indoor unit and passes through the window gap. No room air is blown outside, so nothing is pulled in to replace it, and the noisy part is outdoors. You fit it yourself with no installer. On 4 October it was £1,099 on Amazon, with other sellers from about £1,000. It has been as low as £950, so check the price before you plan around it.
EcoFlow WAVE 3
Two ducts · about 6,100 BTU · runs from the mains or an add-on battery
A true two-duct design: one duct brings outdoor air to the condenser and the other takes it away. It is small, though, at about half the output of a typical 12,000 BTU portable, so it suits a tent, campervan, garden office or box room and not a living room. EcoFlow's UK store lists it at £1,299 and sold out; a few resellers show it from about £850.
Dual-hose units from marketplace sellers
Amazon, eBay and Wayfair · brands you may not recognise
Search any marketplace for "dual hose air conditioner" and you'll find a handful of units, mostly from brands with no UK service network, and some shipped by import sellers. Three checks before you pay: the unit is rated for 230V with a UK plug (US models are 115V and won't run here), the claimed BTU is believable for the watts it draws, and there is a UK returns address. Our spec checker does the second one in 30 seconds.
Which should you pick? Own a single-hose unit with two separate grilles: do the mod. Buying from scratch for occasional heatwaves: a good single-hose unit plus the mod. Cooling a bedroom most nights from June to September: the PortaSplit, or a fitted split system if you own the home.
Why single-hose portable ACs underperform
Inside every portable AC are two separate air circuits. The evaporator side takes your room air, cools it and blows it back at you. The condenser side needs a stream of air to carry the extracted heat away. In a single-hose unit that stream is also your room air, blown out of the window at roughly 300–500 cubic metres an hour.
That creates two problems at once:
1. You throw away air you paid to cool
The air going out through the hose is partly air the unit has already conditioned. Cooling it cost you electricity; now it's outside.
2. Negative pressure pulls heat in
A room can't lose 400m³ of air an hour. Replacement air rushes in around doors, floorboards, loft hatches and trickle vents, and on a 32°C afternoon that air is hot.
It's like bailing out a boat with a bucket that opens a leak every time you use it. And it isn't a fringe theory: the US Department of Energy rewrote its test standard for portable ACs (called SACC) to count this infiltration. Under it, a single-hose unit's rating typically comes out 30–40% below the headline BTU figure on the box.
What the dual-hose mod does
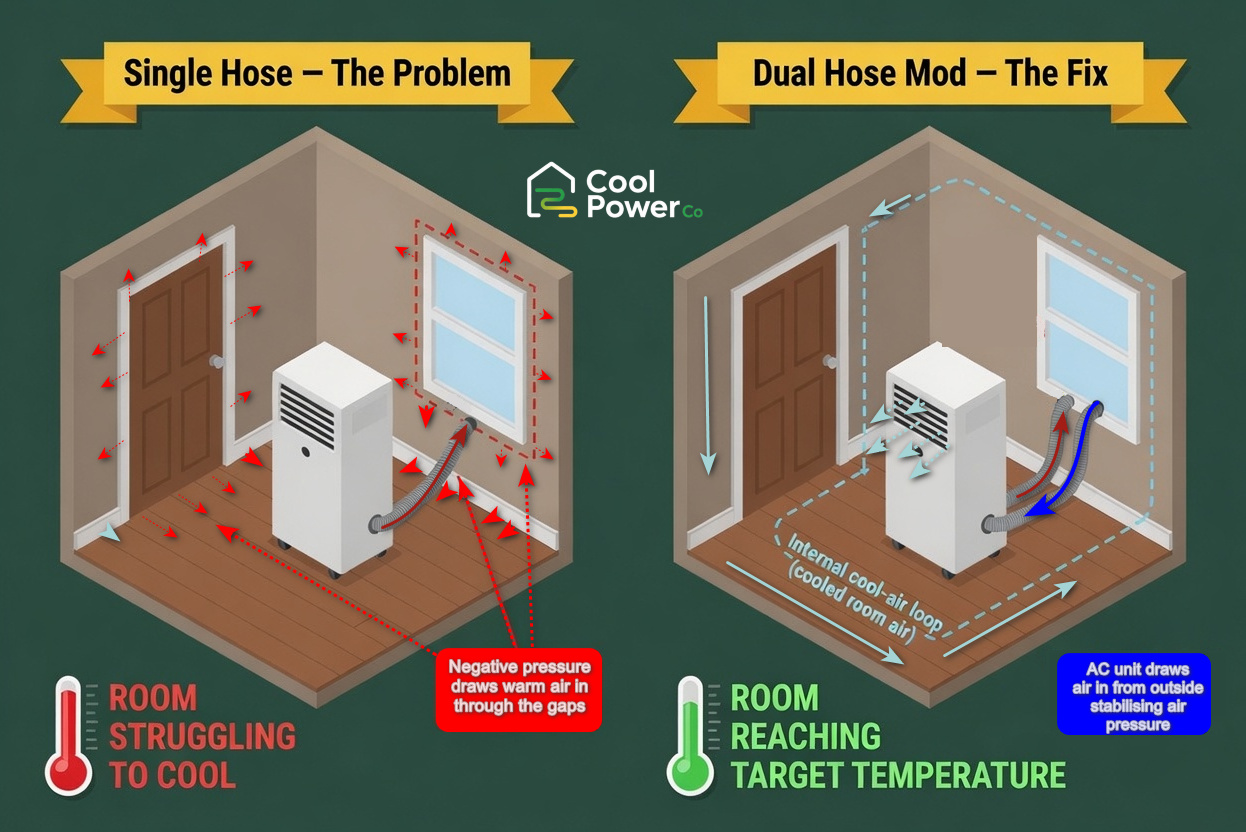
The fix is simple: give the condenser its own supply of outdoor air. A second hose runs from the window to the condenser's intake grille, usually the lower vents on the back of the unit. The hot side of the machine now breathes outside air in and pushes it straight back out, in a loop that never touches your room air.
No cooled air is wasted, no negative pressure builds, no hot air creeps in around your doors, and the evaporator side gets on with the only job you care about: cooling the room. Factory dual-hose portable units work exactly this way. You're retrofitting the same layout for the price of a takeaway.
What this mod is not: a way to cool two rooms. The second hose carries warm outdoor air to the condenser, never cold air. Blocking the cold outlet to try to redirect it would harm the unit.
Will it work on my unit?
Look at the back of your unit before you buy anything. The mod depends on one thing: two clearly separate air intakes.
Good candidate
- It has one hose going to the window
- The back has two distinct grilles: one upper (room air) and one lower (condenser)
- You can cover the lower grille without touching the upper one
- It's out of warranty, or you're comfortable with a reversible mod
- Your room is draughty, or you use the unit on the hottest days
Poor candidate
- The intake is one continuous wrap-around grille
- You can't tell which grille feeds which side
- It's already a dual-hose model
- The unit is simply too small for the room (the mod won't fix sizing)
- It's brand new and you'd rather keep the warranty clean
Not sure which grille is which? Run the unit and hold a sheet of paper near each one. Both pull air in, but the condenser intake is the one nearest the exhaust hose outlet. Then search your model number plus "dual hose mod": for popular models someone has usually documented it.
Does it work? The honest numbers
Yes, with caveats. People who've measured the conversion commonly report 20–40% better effective cooling and faster pull-down, with the biggest gains on the hottest days, when the air being dragged in is hottest. Your result depends on two things: how leaky the room was (a leakier room means a bigger improvement) and how well you seal the new intake.
| Single hose (as sold) | After the mod | Factory dual-hose | Split system | |
|---|---|---|---|---|
| Pulls hot air into the room | Yes | No, if well sealed | No | No |
| Cooled room air wasted | Yes | No | No | No |
| Extra cost | £0 | £18–£40 | Hard to find in the UK | £1,500+ installed |
| Running cost per hour | 26–40p | 26–40p, for fewer hours | 26–40p | 8–13p |
| Noise | Loud | The same | Loud | Quiet |
What it won't do: turn an 8,000 BTU unit into a 12,000 BTU one, make it quieter, or cool a room the unit was never sized for. One trade-off to know: the condenser now breathes outdoor air, which is warmer than your room air, so the machine itself works slightly harder. The gain from stopping infiltration is bigger than that loss on hot days, and smaller on mild ones. If your unit is too small for the space, see the BTU sizing in our portable AC guide. Many cheap units also overstate their output; our guide to unbranded portable ACs explains how to read the specs. If you cool every day all summer, a split system beats any mod.
The dual-hose conversion kit: what you need
We haven't found a boxed, fit-any-unit dual-hose conversion kit on sale in the UK. The kit is three off-the-shelf parts and a roll of tape, or a printed adapter made for your model.
Every part is cheap and easy to find all year. If you already have a window seal kit and some stiff cardboard, the hose and tape come to about £18. Buying everything new is £30–£40.
Kair 152mm Flexible Duct Hose (3m)
The second hose · UK-made · wire-reinforced PVC · cut to length
A 6-inch (152mm) hose matches most portable AC ducting. Three metres is more than enough: keep the run as short and straight as you can and trim the excess. Kair is a proper UK ventilation brand, not a no-name import.
Universal Window Seal Kit
For sliding and tilt windows · zip openings for both hoses
The fabric seal sticks to the window frame with the adhesive strip supplied and zips shut around both hoses. Sealing matters twice as much with two hoses: any gap lets outdoor air come straight back in.
Casement Window Seal Kit
For side-opening windows, the most common UK type
Most UK homes have casement (side-hinged) windows, which sliding-window kits fit badly. This one is shaped for them. Buy whichever matches your window; you only need one.
Plus, from any DIY shop or your shed
Aluminium foil tape (about £6; not fabric duct tape, which peels in heat), a sheet of foam board or stiff corrugated cardboard (about £5, or free) for the intake shroud, and cable ties or a 150mm hose clip. Tools: a craft knife, a ruler and a marker.
Skip the DIY shroud: free 3D-printable adapters exist for many models
Printables.com hosts free community-designed adapters, such as this dual-hose adapter for the Electrolux/AEG ChillFlex. Search the site for your model number plus "dual hose". No printer? Many libraries and makerspaces print for a few pounds, and sellers on Etsy and eBay print and post the same designs for £10–£20. A model-specific adapter seals better than a hand-built shroud, and the seal is where the performance comes from.
Bonus: insulate the exhaust hose too
Optional add-on that stops the hot exhaust hose heating the room
The exhaust hose runs hot and radiates some of that heat back into the room. An insulated sleeve wraps round it with adjustable straps; UK reviewers describe the hose going from hot to barely warm. It's a cheap complement to the mod, and it helps on an unmodified unit too.
Step by step: the conversion
-
1
Unplug the unit and find the two intakes
On the back, the condenser intake is the grille nearest the exhaust hose connection, usually the lower rear panel. Then find the other intake: the evaporator (room air) grille, usually higher up or on the side. That one must stay completely uncovered.
-
2
Build the intake shroud
Cut foam board into a shallow box that covers the condenser grille only, with a 150mm round hole for the hose. Seal every edge to the casing with foil tape. Airtightness is the whole game: gaps mean the unit pulls room air again and you gain little.
-
3
Attach the new hose
Fit the hose to the hole in the shroud, secure it with a hose clip or cable ties, and tape the joint. Cut the hose so the run to the window is as short and straight as possible. Every bend and sag costs airflow.
-
4
Run both hoses to the window
Fit the window seal kit and pass both hoses through, side by side. Outside, keep the two hose ends at least 20–30cm apart if you can, so the intake isn't breathing the exhaust's hot air.
-
5
First run: watch and listen
Run the unit for 30 minutes. The cold airflow should feel as strong as before; if it's weaker, you've partly blocked the evaporator intake, so fix that straight away. The exhaust hose should be hot as usual. No new rattles, no error codes, no ice on any visible coil.
-
6
Measure the difference
With a room thermometer, time how long the unit takes to drop the room by 3°C before and after, on similar days. Most people also notice it at the door: the warm draught that used to creep in underneath has gone.
Troubleshooting
| What you notice | Likely cause | Fix |
|---|---|---|
| Cold airflow is weaker than before | The shroud overlaps the room-air intake | Trim or reposition the shroud until that grille is fully clear |
| Unit cuts out or shows an overheat code | The new hose is too long, kinked or crushed, starving the condenser | Shorten and straighten the hose; never use a hose narrower than the exhaust |
| Little or no improvement | Leaks at the shroud or window seal, or the intake is drawing in exhaust air | Re-tape every edge and move the two hose ends further apart outside |
| New rattle or whistle | A loose edge on the shroud or tape lifting | Press the tape down and add a strip along the noisy edge |
Safety and caveats
Read before you start:
Never cover the evaporator (room air) intake. On some compact units the two intakes sit close together. Restricting the evaporator's airflow can freeze the coil and, over time, damage the compressor. If you can't clearly separate the two intakes on your model, this mod isn't for your unit.
Don't starve the condenser either. The new hose adds resistance to the condenser's airflow. Keep it short, straight and full-width. If the unit trips out or the exhaust seems much hotter than before, shorten the run or take the mod off.
Ducting and tape only. The mod changes where air comes from and nothing else. Never open the casing, and never touch the electrics or the refrigerant circuit. If a guide asks you to unscrew panels, find a better guide.
Warranty: the mod is fully reversible (peel the tape off), but a manufacturer could still dispute a fault that happened while it was fitted. On a unit under warranty, weigh that up first.
The unit stays indoors. Putting the whole machine outside is a different, much rougher project with weatherproofing and safety problems this guide doesn't endorse.
Frequently asked questions
Related Guides
Using AC every day? A split system beats any mod.
8–13p an hour to run against 26–40p for a portable, with no hoses at all, and autumn is the quietest time to book an installer. Get free quotes from F-Gas certified local installers.
Get Free AC Quotes →Last updated: 4 October 2026. Prices and stock checked on 3 and 4 October 2026 and will change. Running costs based on the October 2026 Ofgem price cap of 26.32p/kWh. Performance improvements vary by unit, room air-tightness and how well the intake is sealed. Modify at your own risk: this guide involves no electrical or refrigerant work, but any modification may affect your manufacturer's warranty. If in doubt about your model, don't proceed.